Smartphones And Mobiles
Apple's iTunes Match service lets you store all your music in the cloud, but some people prefer to have a local copy of all their music instead. It's free, and doesn't disappear if your internet connection goes down.
You might have thousands of tracks you've ripped from CD over the years, for example. This is the more conventional way to use iTunes and it's great, until your library starts to get too big for your hard drive. And with more and more people using ultraportable MacBook Airs, storage capacity can be an issue.
Luckily, iTunes makes it fairly easy to move your library to an external drive, even one connected to your Wi-Fi router. This can be a regular USB drive, for which you're best off using an Apple AirPort Extreme router, or a NAS (network attached storage) drive. These have special abilities, like being able to broadcast a music collection to any copies of iTunes on your network.
The clever thing about using iTunes Server on a NAS is that these drives tend to be very high capacity, and can be shared between lots of users. The beauty of having a shared, wireless music library is that it can be much bigger than one you would store on your Mac, and more advanced users can control who accesses it by tweaking the shared drive settings.
At a simpler level, you might just want to access the library yourself, in which case all you need is an AirPort Extreme and a USB hard drive.
- Music App Of Iphone Brought Many New Features In Ios 8.4
Changes are about to come in the user interface of Music App of your iPhone. Yes with the advent of iOS 8.4, there are many changes that you will watch in the Music app on your iPhone and iPad. The new version featured in a preview version of an...
- Next Version Of Ios Will Brign You Password-less Downloading
More Comfortable An interesting upcoming feature of the next version of Apple?s famous iOS operating system is that it will allow you to download applications and other content without a Password. This feature will be enable in iOS 8.3. it will make easier...
- Os X 10.10 Yosemite Review
Yosemite is the second version of OS X since its reboot last year, when Apple switched from naming its annual OS X updates after big cats to places in California. It also neatly side-stepped the problem of where to go after 10.9 by avoiding the use of...
- Share Files Between Android And Windows With Es File Explorer
There was a time when the only way you could share files between your Android device and a Windows computer was by using a USB cable. These days, there are wireless options available that make it easier to share files. One such option is ES File Explorer,...
- Handy Android Tablet Tips And Tricks
Android on a tablet is just about as good as it gets right now - with every iteration it gets better and more feature-rich, and soon the delightfully-named Android 4.0 Ice Cream Sandwich (ICS) will be available too. If you're in the market for such...
Smartphones And Mobiles
How to move your iTunes library to an external drive
Apple's iTunes Match service lets you store all your music in the cloud, but some people prefer to have a local copy of all their music instead. It's free, and doesn't disappear if your internet connection goes down.
You might have thousands of tracks you've ripped from CD over the years, for example. This is the more conventional way to use iTunes and it's great, until your library starts to get too big for your hard drive. And with more and more people using ultraportable MacBook Airs, storage capacity can be an issue.
Luckily, iTunes makes it fairly easy to move your library to an external drive, even one connected to your Wi-Fi router. This can be a regular USB drive, for which you're best off using an Apple AirPort Extreme router, or a NAS (network attached storage) drive. These have special abilities, like being able to broadcast a music collection to any copies of iTunes on your network.
The clever thing about using iTunes Server on a NAS is that these drives tend to be very high capacity, and can be shared between lots of users. The beauty of having a shared, wireless music library is that it can be much bigger than one you would store on your Mac, and more advanced users can control who accesses it by tweaking the shared drive settings.
At a simpler level, you might just want to access the library yourself, in which case all you need is an AirPort Extreme and a USB hard drive.
How to move your iTunes library
1. Gather your files
If you've been adding music to a library for a while, it can be worth forcing iTunes to copy everything into a single folder prior to moving it, to make sure you don't lose or unlink music files. Go into iTunes' Preferences > Advanced tab and turn on Keep iTunes Media Folder Organized.2. Consolidate the library
Now go into File > Library in iTunes and choose Organize Library. From the window, tick Consolidate Files and press OK. This forces iTunes to copy music files that currently exist outside of your root music folder into that folder, making it possible to safely copy it in the next step.3. Copy the library
Now connect the USB drive to your Mac or to your AirPort Express, in which case you will need to use AirPort Utility to identify it as a shared volume. Go to your Home directory > Music and find the folder called iTunes. Copy this folder to a sensible location on your USB drive.4. Reset the library location
Back in iTunes, go to Preferences > Advanced and click to change the library location. Point iTunes at the location where you just copied it, and it will see the library over the network. Also, go into System Preferences > Users and Groups and make the networked drive auto-mount on login.5. Use a NAS
Here we have a NAS drive connected to our AirPort Extreme using an Ethernet cable, with the NAS manager software installed. Drag a folder of music over to the drive and place it inside a pre-created folder called Music. You could also drag your iTunes library folder to this location.6. Log into the NAS
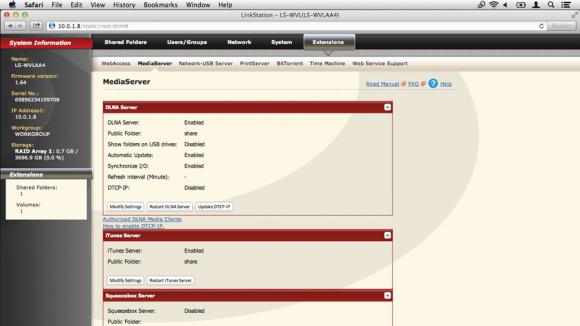
Log into the NAS control panel. In the case of Buffalo drives it's done by right-clicking on it and choosing Settings. You may have to log in using your administrator password. Once logged in, click to the Extensions section for a tab called MediaServer. There's a section called iTunes Server.7. Turn on iTunes Server
Click to enable iTunes Server. You may also want to customise the location of the shared music folder: click Modify Settings and use the Public Folder dropdown to select any drive folders. Here, we've pointed it at the Music folder we created earlier. Click Save and return to iTunes.8. Access the share
Back in iTunes, look in the sidebar on the left under the Shared tab and you should now see your NAS device. These can be played by anyone on your network with access to the NAS. iTunes may not find artwork for the files since this relies on signing in with an Apple ID, but they will play fine.- Music App Of Iphone Brought Many New Features In Ios 8.4
Changes are about to come in the user interface of Music App of your iPhone. Yes with the advent of iOS 8.4, there are many changes that you will watch in the Music app on your iPhone and iPad. The new version featured in a preview version of an...
- Next Version Of Ios Will Brign You Password-less Downloading
More Comfortable An interesting upcoming feature of the next version of Apple?s famous iOS operating system is that it will allow you to download applications and other content without a Password. This feature will be enable in iOS 8.3. it will make easier...
- Os X 10.10 Yosemite Review
Yosemite is the second version of OS X since its reboot last year, when Apple switched from naming its annual OS X updates after big cats to places in California. It also neatly side-stepped the problem of where to go after 10.9 by avoiding the use of...
- Share Files Between Android And Windows With Es File Explorer
There was a time when the only way you could share files between your Android device and a Windows computer was by using a USB cable. These days, there are wireless options available that make it easier to share files. One such option is ES File Explorer,...
- Handy Android Tablet Tips And Tricks
Android on a tablet is just about as good as it gets right now - with every iteration it gets better and more feature-rich, and soon the delightfully-named Android 4.0 Ice Cream Sandwich (ICS) will be available too. If you're in the market for such...