Smartphones And Mobiles
Ok, the Google Nexus 5 has been out there for a while and we think it's about time for a root tutorial. So, without further ado, here is our step by step guide with images.

As always, gaining root access is risky, and if you do not follow the procedure properly, you can end up with an unusable phone. Also, please note that all data is deleted during the operation so back up all your data first. Neither AndroidPIT or myself will be held responsible for anything unflattering that may happen to your Nexus 5.
The following procedure is valid only for the Google Nexus 5.
Ensure that you have Administrator rights on Windows (if you do not know what these are, you probably haven't got them).
Make sure your Nexus 5 has at least 60% of battery. 70% is better, and fully charged is... you get the drift.
Windows 32- & 64-bit
Mac OS X 32- & 64-bit
Linux 32- & 64-bit
The general procedure is the same as on Windows, but the commands to use in the terminal are different on Mac and Linux. This tutorial is for a PC running Windows.
Custom Recovery:
ClockworkMod (CWM)
Root:
SuperSU v1.65
2. Launch "SDK-Manager.exe" and install the following packages:

2. Reboot into fastboot mode by pressing and holding the Volume Down + Power button.
3. Connect your Nexus 5 to your computer with a USB cable.
4. Open the Android SDK > SDK > Platform-Tools directory then right-click in an empty area while holding the shift key.
5. Click "Open the command prompt here".
6. Enter the following command:
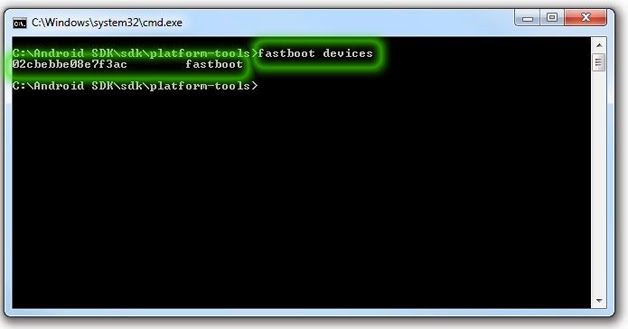
If you get a serial number, it's good and you can continue. Otherwise, your drivers are not installed correctly.
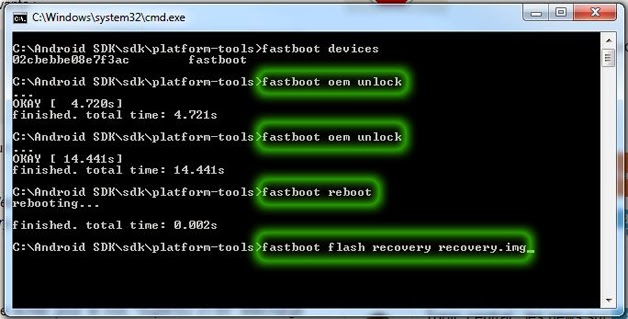
7 . Enter the following command:
9 . Enter the following command:
2. Reboot into fastboot mode (as in Section II)
3. Copy the custom recovery file downloaded earlier into the Android SDK > SDK > Platform-Tools directory. Rename the file "recovery.img". If it does not work, simply rename the file "recovery" without the "img".
4. In the command prompt window (as per Section II), enter the following command:
5. On your Nexus 5, use the unusable Volume buttons to select the "Restart bootloader" option and press the Power button.
6. You can now verify the custom recovery installation by entering "Recovery Mode". If you arrive on the CWM screen, the recovery is all good.
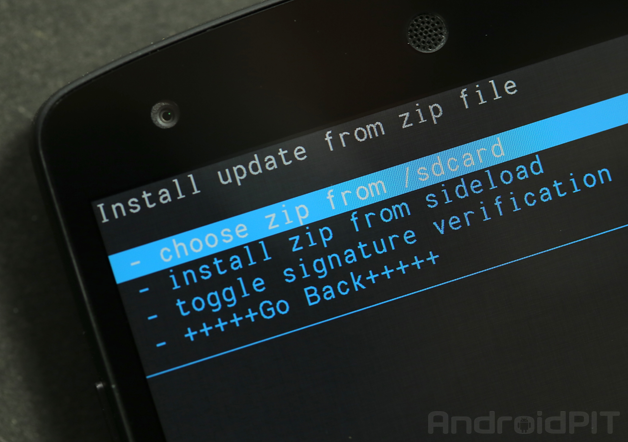
2 . Reboot into fastboot mode (as in Section II) and choose Recovery Mode.
3 . Choose the "install zip from sdcard" option.
4 . Select "choose zip from sdcard".
5 . Locate the "SuperSU v1.65" file and select it.
6 . Confirm with "Yes".
7 . Once the file installation is complete, restart by selecting "go back" then "reboot now".
8 . Final check: install an application to verify root such as Root Checker. If everything is green, it's all good! Congratulations, your Google Nexus 5 is rooted!
- Miui V7 Beta Ported To Cherry Mobile Flare S3 Quadcore Version 1.03
NOTE:This is a GUI Design of the latest MIUI 7. U S E_ A T_ Y O U R _ O W N _ R...
- (video) Instructions On How To Use The Nexus 7 Toolkit
Install Romcook and installing recovery mode seems to be an inevitable demand for the Nexus 7 2013 users . However, not everyone can perform rooting out , thus making the toolkit available are very good options for Android users . Nexus 7 Toolkit 2013...
- (tutorial) Install All Android 4.3 Official Version For Nexus 4, Nexus 7, Galaxy Nexus And Nexus 10
Despite the claims of this updated version will be available for devices using the Nexus 4 , Nexus 7 , Nexus 10 and Nexus Galaxy even today , but depending on the area where updates may be late in few days . If you can not wait for OTA updates directly...
- How To Root Samsung Galaxy S5 - Rooting Tips And Tricks
Here?s how to root your Samsung Galaxy S5. I have put together 2 different ways of rooting your Samsung Galaxy S5 depending on what you are going to do with your Galaxy S5. If you need to backup your phone, install custom ROM, and also have root,...
- How To Root The Htc One
The HTC One is a massively popular phone -- so popular that its manufacturer is struggling to keep up with demand. Should you be lucky enough to own this blisteringly fast Android powerhouse, then you've no doubt already marvelled at its terrific...
Smartphones And Mobiles
How to root Google Nexus 5
Ok, the Google Nexus 5 has been out there for a while and we think it's about time for a root tutorial. So, without further ado, here is our step by step guide with images.
As always, gaining root access is risky, and if you do not follow the procedure properly, you can end up with an unusable phone. Also, please note that all data is deleted during the operation so back up all your data first. Neither AndroidPIT or myself will be held responsible for anything unflattering that may happen to your Nexus 5.
The following procedure is valid only for the Google Nexus 5.
Prerequisites
Install the Nexus 5 drivers on your PC (just plug it in and wait a few minutes, it will install them automatically).
Ensure that you have Administrator rights on Windows (if you do not know what these are, you probably haven't got them).
Make sure your Nexus 5 has at least 60% of battery. 70% is better, and fully charged is... you get the drift.
Downloads
Android SDK:
Windows 32- & 64-bit
Mac OS X 32- & 64-bit
Linux 32- & 64-bit
The general procedure is the same as on Windows, but the commands to use in the terminal are different on Mac and Linux. This tutorial is for a PC running Windows.
Custom Recovery:
ClockworkMod (CWM)
Root:
SuperSU v1.65
I. Installing ADB and Fastboot
1. Download the Android SDK for your computer's operating system and unzip it in a folder named "Android SDK''.
2. Launch "SDK-Manager.exe" and install the following packages:
- Tools > Android SDK Tools, Android SDK Platform-Tools
- Extras > Android Support Library, Google USB Driver
II. Unlocking the bootloader
1. Turn off your Nexus 5.
2. Reboot into fastboot mode by pressing and holding the Volume Down + Power button.
3. Connect your Nexus 5 to your computer with a USB cable.
4. Open the Android SDK > SDK > Platform-Tools directory then right-click in an empty area while holding the shift key.
5. Click "Open the command prompt here".
6. Enter the following command:
fastboot devices
If you get a serial number, it's good and you can continue. Otherwise, your drivers are not installed correctly.
7 . Enter the following command:
fastboot oem unlock8 . On your Nexus 5, confirm with "Yes" using the Volume keys to move and the Power button to confirm.
9 . Enter the following command:
fastboot reboot
III. Installing the custom recovery
1. Turn off your Nexus 5
2. Reboot into fastboot mode (as in Section II)
3. Copy the custom recovery file downloaded earlier into the Android SDK > SDK > Platform-Tools directory. Rename the file "recovery.img". If it does not work, simply rename the file "recovery" without the "img".
4. In the command prompt window (as per Section II), enter the following command:
fastboot flash recovery recovery.img
5. On your Nexus 5, use the unusable Volume buttons to select the "Restart bootloader" option and press the Power button.
6. You can now verify the custom recovery installation by entering "Recovery Mode". If you arrive on the CWM screen, the recovery is all good.
IV. Root
1 . Reboot your Nexus 5 normally. Copy the previously downloaded file "SuperSU v1.65" to the root of your smartphone.
2 . Reboot into fastboot mode (as in Section II) and choose Recovery Mode.
3 . Choose the "install zip from sdcard" option.
4 . Select "choose zip from sdcard".
5 . Locate the "SuperSU v1.65" file and select it.
6 . Confirm with "Yes".
7 . Once the file installation is complete, restart by selecting "go back" then "reboot now".
8 . Final check: install an application to verify root such as Root Checker. If everything is green, it's all good! Congratulations, your Google Nexus 5 is rooted!
- Miui V7 Beta Ported To Cherry Mobile Flare S3 Quadcore Version 1.03
NOTE:This is a GUI Design of the latest MIUI 7. U S E_ A T_ Y O U R _ O W N _ R...
- (video) Instructions On How To Use The Nexus 7 Toolkit
Install Romcook and installing recovery mode seems to be an inevitable demand for the Nexus 7 2013 users . However, not everyone can perform rooting out , thus making the toolkit available are very good options for Android users . Nexus 7 Toolkit 2013...
- (tutorial) Install All Android 4.3 Official Version For Nexus 4, Nexus 7, Galaxy Nexus And Nexus 10
Despite the claims of this updated version will be available for devices using the Nexus 4 , Nexus 7 , Nexus 10 and Nexus Galaxy even today , but depending on the area where updates may be late in few days . If you can not wait for OTA updates directly...
- How To Root Samsung Galaxy S5 - Rooting Tips And Tricks
Here?s how to root your Samsung Galaxy S5. I have put together 2 different ways of rooting your Samsung Galaxy S5 depending on what you are going to do with your Galaxy S5. If you need to backup your phone, install custom ROM, and also have root,...
- How To Root The Htc One
The HTC One is a massively popular phone -- so popular that its manufacturer is struggling to keep up with demand. Should you be lucky enough to own this blisteringly fast Android powerhouse, then you've no doubt already marvelled at its terrific...